FJcloud実践
FJcloud-VでKubernetesを使う方法~マルチクラスタメッシュ構成_疎通確認編~
目次
この記事は、FJcloud-V(旧ニフクラ)ブログで2023-10-17に公開された記事を移転したものです。
こんにちは、CRE部 技術支援チームです。
今回で最終回です。
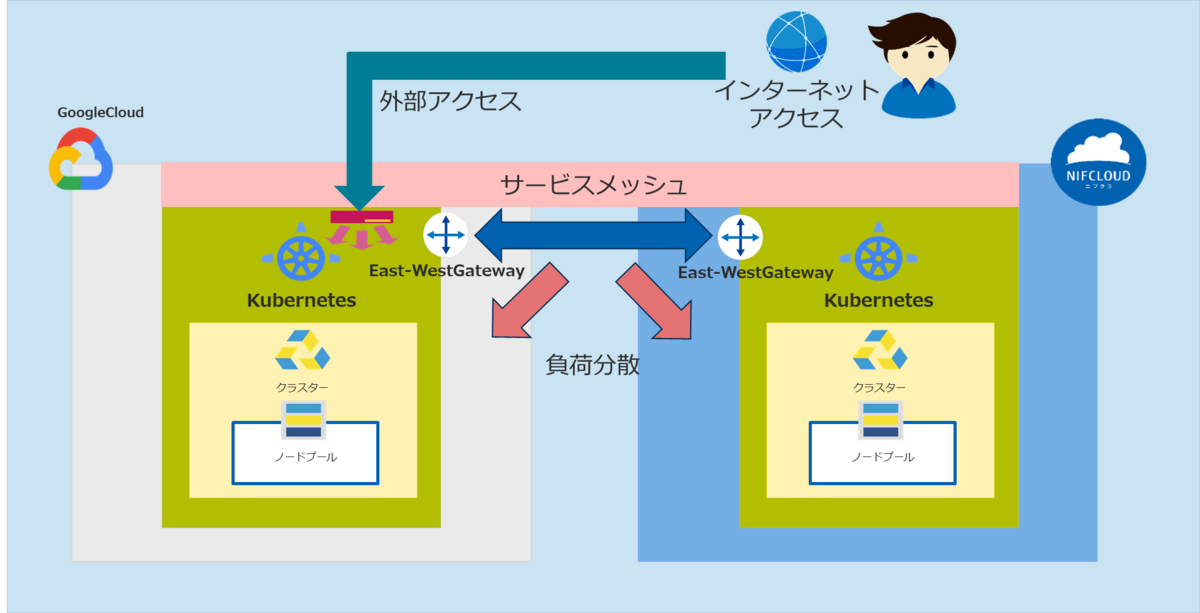
第1回、第2回、第3回で構築したマルチクラウド環境のマルチクラスタメッシュ(他社サイトリンク)構成にしたKubernetesクラスタで負荷分散を確認する検証を実施します。
第1回. Anthos on bare metalクラスタインストール・作成編
第2回. マルチクラウド環境構築_VPN接続編
第3回. マルチクラスタメッシュ構成_East-WestGateway作成編
第4回. マルチクラスタメッシュ構成_疎通確認編
目次
はじめに
今回は以下の検証を実施して、Kubernetesクラスタ負荷分散と可用性の確認としてKubernetesクラスタの冗長化を確認します。
①. マルチクラスタメッシュのロードバランシングが稼働してFJcloud-V(旧ニフクラ)とGoogleCloudのKubernetesクラスタ間で負荷分散されているかを確認します。
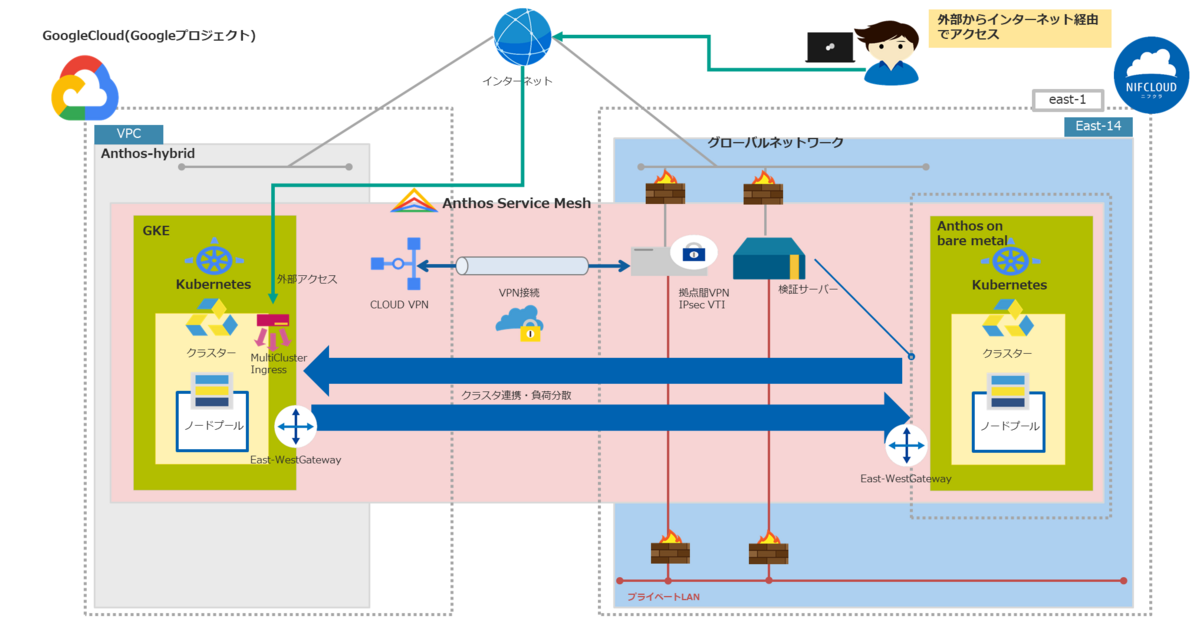
②. マルチクラスタメッシュの環境にインターネットからアクセスするために外部ロードバランサーとしてMultiClusterIngress・MultiClusterService(他社サイトリンク)をGoogleCloud環境に作成してGoogleCloudのKubernetesクラスタ間で負荷分散されているかを確認します。
③. 上記②. の環境でFJcloud-V(旧ニフクラ)側(Anthos on bare metalクラスタ)が停止した場合、 GoogleCloud側(GKEクラスタ)が稼働して冗長化が担保されていることを確認します。(アクティブ・アクティブ構成)
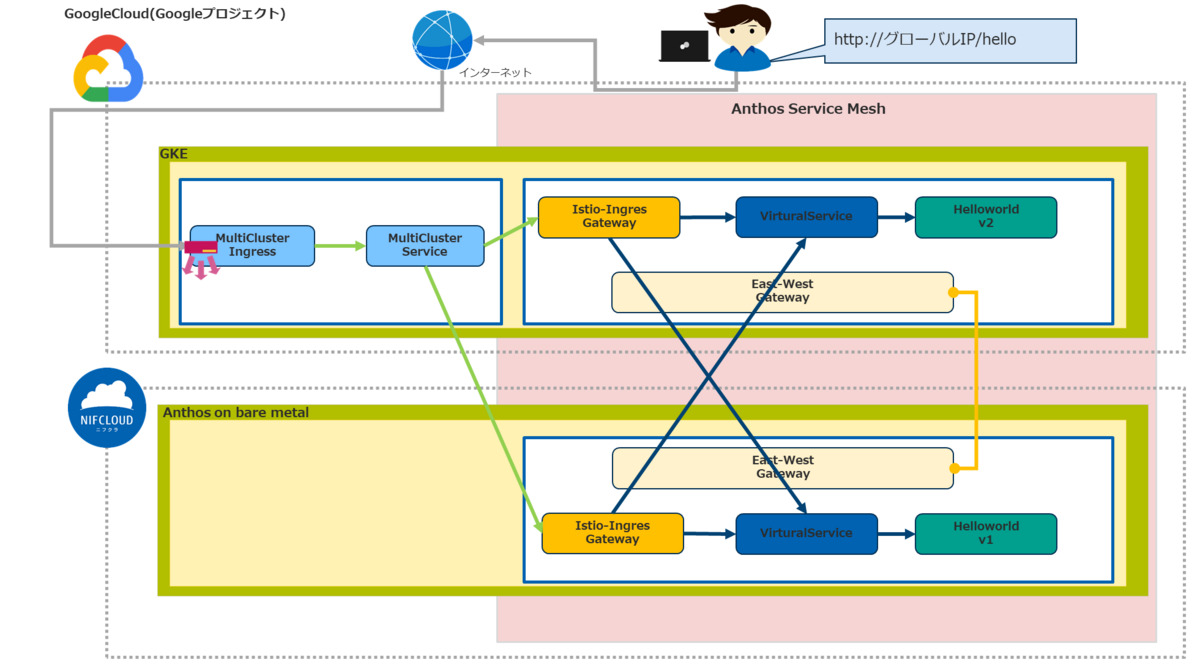
全体構成イメージ
前提条件
- FJcloud-V(旧ニフクラ)の基本的なコントロールパネルの操作、サービスを利用する知識
- GoogleCloudの基本的なコントロールパネルの操作、サービスを利用する知識
- Kubernetesの基本的な知識、利用経験
- Google Kubernetes Engine(GKE)クラスタの基本的な知識、利用経験
- Istio(他社サイトリンク)等のサービスメッシュの基本的な知識、利用経験
- GoogleCloudのアカウントを取得済み
- GoogleCloudにプロジェクトが作成済み
利用リソース
前回までにFJcloud-V(旧ニフクラ)とGoogleCloudで作成したリソースを利用します。
①マルチクラスタメッシュ構成の疎通確認
マルチクラスタメッシュになっているFJcloud-V(旧ニフクラ)とGoogleCloud間の疎通確認を実施します。

ASMパッケージのサンプルpod、service(他社サイトリンク)を各クラスタにデプロイします。 今回は以下のサンプルを使用します。
- sleep(他社サイトリンク)。疑似的なアクセス実行に使用します。curl がインストールされた ubuntu コンテナのpod、serviceを作成します。
- helloworld(他社サイトリンク)。呼び出されたときにhelloの文字列、バージョン、インスタンス (ホスト名) を返却するWEBアプリのpod、serviceを作成します。
個別コマンドを実行して作成しても良いのですが、今回は以下の内容でシェルを作成します。
- FJcloud-V(旧ニフクラ)環境、GoogleCloud環境にsampleという名前空間を作成します。
- FJcloud-V(旧ニフクラ)環境、GoogleCloud環境の名前空間sampleにサイドカー プロキシ インジェクション有効ラベルを作成します。名前空間sample上のpod、serviceがASMの各種機能が有効になります。詳細はサイドカー プロキシ インジェクションのガイド(他社サイトリンク)を参照してください。
- FJcloud-V(旧ニフクラ)環境、GoogleCloud環境の名前空間sampleにsleepのpod、serviceを作成します。
- FJcloud-V(旧ニフクラ)環境、GoogleCloud環境の名前空間sampleにhelloworldのpod、serviceを作成します。
- helloworldの応答が判別できるようにFJcloud-V(旧ニフクラ)Anthosクラスタ(v1)、GKEクラスタ(v2)のラベルタグを付与します。
$ ./set_sample.sh

namespace/sample created
label "istio-injection" not found.
namespace/sample labeled
serviceaccount/sleep created
service/sleep created
---------省略---------
set_sample.sh
#!/bin/bash

for CTX in ${CTX_CLUSTER1} ${CTX_CLUSTER2}
do
    #FJcloud-V(旧ニフクラ)環境、GoogleCloud環境にsample名前空間作成
    kubectl create --context=${CTX} namespace sample

    #FJcloud-V(旧ニフクラ)環境、GoogleCloud環境にサイドカー プロキシ インジェクション設定
    kubectl label --context=${CTX} namespace sample \
        istio-injection- istio.io/rev=asm-1175-9 --overwrite

    #FJcloud-V(旧ニフクラ)環境、GoogleCloud環境の名前空間sampleにsleepのpod、serviceを作成
    kubectl apply --context=${CTX} \
        -f asm_output/istio-1.17.5-asm.9/samples/sleep/sleep.yaml -n sample
done

#FJcloud-V(旧ニフクラ)環境の名前空間sampleにhelloworldのserviceを作成
kubectl create --context=${CTX_CLUSTER1} \
     -f asm_output/istio-1.17.5-asm.9/samples/helloworld/helloworld.yaml \
     -l service=helloworld -n sample


#FJcloud-V(旧ニフクラ)環境の名前空間sampleにhelloworldのpod(v1ラベルタグ付与)を作成
kubectl create --context=${CTX_CLUSTER1} \
     -f asm_output/istio-1.17.5-asm.9/samples/helloworld/helloworld.yaml \
     -l version=v1 -n sample

#GoogleCloud環境の名前空間sampleにhelloworldのserviceを作成
kubectl create --context=${CTX_CLUSTER2} \
     -f asm_output/istio-1.17.5-asm.9/samples/helloworld/helloworld.yaml \
     -l service=helloworld -n sample

#GoogleCloud環境の名前空間sampleにhelloworldのpod(v2ラベルタグ付与)を作成
kubectl create --context=${CTX_CLUSTER2} \
     -f asm_output/istio-1.17.5-asm.9/samples/helloworld/helloworld.yaml \
     -l version=v2 -n sample
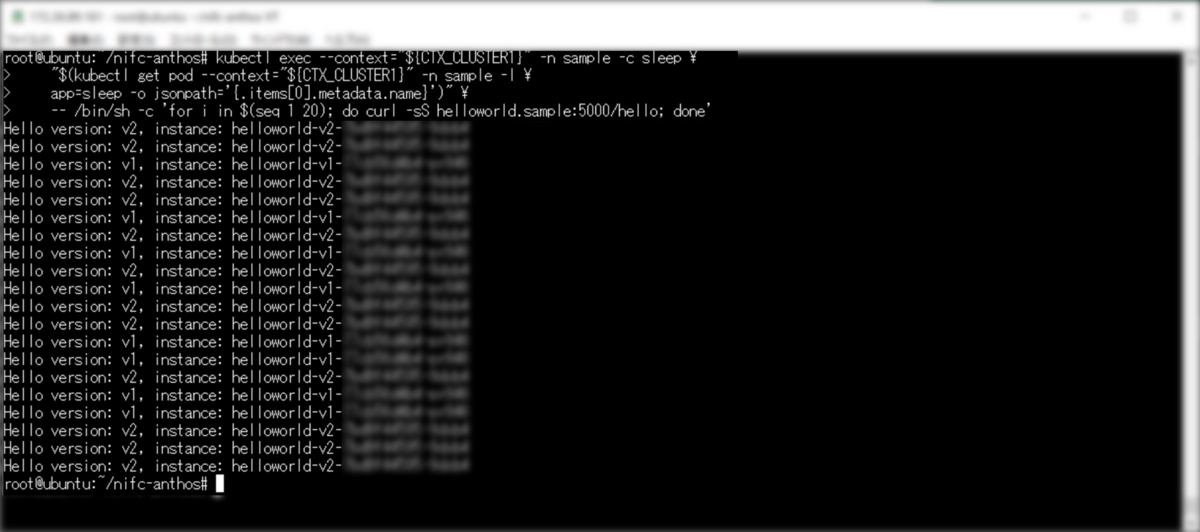
以下のコマンドでFJcloud-V(旧ニフクラ)Anthosクラスタから擬似的なcurlコマンドのアクセスを実施するsleepのpodを実行します。
$ kubectl exec --context="${CTX_CLUSTER1}" -n sample -c sleep \
    "$(kubectl get pod --context="${CTX_CLUSTER1}" -n sample -l \
    app=sleep -o jsonpath='{.items[0].metadata.name}')" \
    -- /bin/sh -c 'for i in $(seq 1 20); do curl -sS helloworld.sample:5000/hello; done'
v1(FJcloud-V(旧ニフクラ)環境)とv2(GoogleCloud環境)が出力されて両方にアクセスしていることが確認できます。ネットワーク間で分散アクセスしていることが確認できます。
以下のコマンドでGKEクラスタから擬似的なcurlコマンドのアクセスを実施するsleepのpodを実行します。
kubectl exec --context="${CTX_CLUSTER2}" -n sample -c sleep \
    "$(kubectl get pod --context="${CTX_CLUSTER2}" -n sample -l \
    app=sleep -o jsonpath='{.items[0].metadata.name}')" \
    -- /bin/sh -c 'for i in $(seq 1 20); do curl -sS helloworld.sample:5000/hello; done'
こちらも、v1(FJcloud-V(旧ニフクラ)環境)とv2(GoogleCloud環境)が出力されて両方にアクセスして、ネットワーク間で分散アクセスしていることが確認できます。

以上で疎通確認は完了です。
②環境構築:外部インターネット、マルチクラウド環境間のアクセス設定
インターネットからマルチクラウド環境にアクセスするために以下の設定をおこないます。
- マルチクラスタメッシュ外からアクセスするためにIstio-IngressGateway・MeshIngress(他社サイトリンク)を作成します。
- インターネットからアクセスするために外部ロードバランサーとしてMultiClusterIngress・MultiClusterService(他社サイトリンク)をGoogleCloud環境に作成します。
- Istio-IngressGatewayからアプリケーション(pod、service)にアクセスするためにVirtualService(他社サイトリンク)を作成します。
マルチクラスタIngress機能を有効化
gcloudコマンドを実行してGKEクラスタのマルチクラスタIngress機能を有効化します。 ※以下の場合はGKEクラスタの「2」を選択します。
$ gcloud container hub ingress enable

Please specify a membership:
 [1] global/nifc-anthosbm-cls
 [2] us-central1/nifc-anthosgke-cls
 [3] cancel

Please enter your numeric choice:  2
名前空間作成
以下のコマンドを実行して各クラスタにIstio-IngressGateway用の名前空間(isito-gateway)を作成します。 ASM機能を有効にするために「istio-injection- istio.io/rev\=asm-ASMのバージョン」でラベルを作成します。
for CTX in ${CTX_CLUSTER1} ${CTX_CLUSTER2}
do
    kubectl create --context=${CTX} namespace nifc-istio-gateway
    kubectl label --context=${CTX} namespace nifc-istio-gateway istio-injection- istio.io/rev=asm-1175-9 --overwrite
done
Istio-IngressGateway編集
ASMパッケージのIstio-IngressGateway構成を利用してIstio-IngressGateway、MultiClusterServiceを作成します。
cpコマンドでIstio-IngressGatewayサンプル定義ファイル群のディレクトリをnifc-istio-ingressgatewayとしてコピーします。
$ cp -r asm_output/samples/gateways/istio-ingressgateway nifc-istio-ingressgateway
mkdirコマンドでMultiClusterIngress定義ファイルを格納するディレクトリを作成します。
$ mkdir -p nifc-istio-ingressgateway/multicluster
mvコマンドでMultiClusterServiceファイルに置き換えます。
$ mv nifc-istio-ingressgateway/service.yaml nifc-istio-ingressgateway/multicluster/multiclusterservice.yaml
viコマンドでMultiClusterService用のmulticlusterservice.yamlの編集します。
※編集項目の詳細はMultiClusterServiceリソース(他社サイトリンク)
$ vi nifc-istio-ingressgateway/multicluster/multiclusterservice.yaml
内容は以下です。 multiclusterservice.yaml
# Copyright 2021 Google LLC
#
# Licensed under the Apache License, Version 2.0 (the "License");
# you may not use this file except in compliance with the License.
# You may obtain a copy of the License at
#
#      http://www.apache.org/licenses/LICENSE-2.0
#
# Unless required by applicable law or agreed to in writing, software
# distributed under the License is distributed on an "AS IS" BASIS,
# WITHOUT WARRANTIES OR CONDITIONS OF ANY KIND, either express or implied.
# See the License for the specific language governing permissions and
# limitations under the License.

# apiVersion: v1
# kind: Service
# metadata:
#   name: istio-ingressgateway
#   labels:
#     app: istio-ingressgateway
#     istio: ingressgateway

apiVersion: networking.gke.io/v1
kind: MultiClusterService
metadata:
  name: istio-ingressgateway
  annotations:
    cloud.google.com/backend-config: '{"default": "ingress-backendconfig"}'
  labels:
    app: istio-ingressgateway
    istio: ingressgateway

#spec:
#  ports:
#  # status-port exposes a /healthz/ready endpoint that can be used with GKE Ingress health checks
#  - name: status-port
#    port: 15021
#    protocol: TCP
#    targetPort: 15021
#  # Any ports exposed in Gateway resources should be exposed here.
#  - name: http2
#    port: 80
#  - name: https
#    port: 443
#  selector:
#    istio: ingressgateway
#    app: istio-ingressgateway
#  type: LoadBalancer

spec:
   template:
     spec:
       ports:
       # status-port exposes a /healthz/ready endpoint that can be used with GKE Ingress health checks
       - name: status-port
         port: 15021
         protocol: TCP
         targetPort: 15021
       # Any ports exposed in Gateway resources should be exposed here.
       - name: http2
         port: 80
       - name: https
         port: 443
       selector:
         istio: ingressgateway
         app: istio-ingressgateway
viコマンドでMultiClusterIngress用にmulticlusteringress.yamlを作成します。
※編集項目の詳細はMultiClusterIngressリソース(他社サイトリンク)を参照してください。
$ vi nifc-istio-ingressgateway/multicluster/multiclusteringress.yaml
内容は以下です。 multiclusteringress.yaml
apiVersion: networking.gke.io/v1
kind: MultiClusterIngress
metadata:
  name: istio-ingressgateway
  labels:
    app: istio-ingressgateway
    istio: ingressgateway
spec:
  template:
    spec:
      backend:
        serviceName: istio-ingressgateway
        servicePort: 80
