FJcloud実践
FJcloud-VでKubernetesを使う方法~マルチクラスタメッシュ構成_East-WestGateway作成編~
この記事は、FJcloud-V(旧ニフクラ)ブログで2023-10-17に公開された記事を移転したものです。 こんにちは、CRE部 技術支援チームです。
前回までにマルチクラウド環境構築_VPN接続までを実施しました。
今回はマルチクラスタメッシュ構成_East-WestGateway作成してFJcloud-V(旧ニフクラ)とGoogleCloudのKubernetesクラスタで負荷分散を構成する方法を紹介します。
第1回. Anthos on bare metalクラスタインストール・作成編
第2回. マルチクラウド環境構築_VPN接続編
第3回. マルチクラスタメッシュ構成_East-WestGateway作成編
第4回. マルチクラスタメッシュ構成_疎通確認編
目次
はじめに
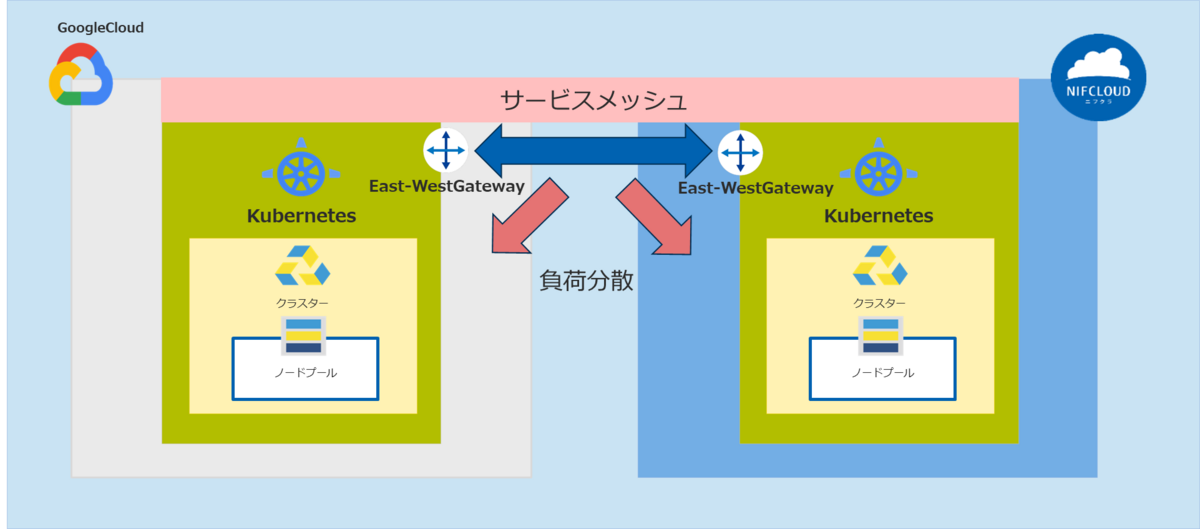
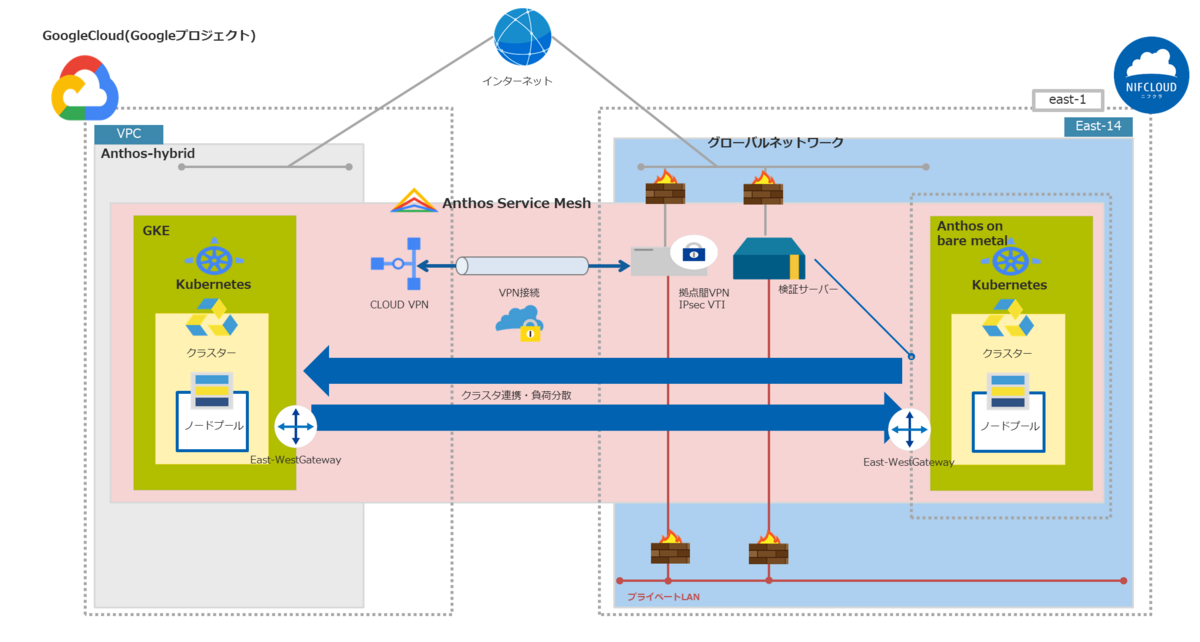
今回はFJcloud-V(旧ニフクラ)とGoogleCloudのKubernetesクラスタをIstioベースのAnthos Service Mesh(ASM)(他社サイトリンク)を利用してマルチクラウド環境間で負荷分散するマルチクラスタメッシュ(他社サイトリンク)構成を構築します。
異なるネットワーク間で負荷分散を実現するためにAnthos Service Mesh(ASM)パッケージの内容(他社サイトリンク)を編集してEast-WestGateway(他社サイトリンク)を作成します。
また、今回のほぼ全ての作業はFJcloud-V(旧ニフクラ)環境の検証サーバーのコマンド実行になります。
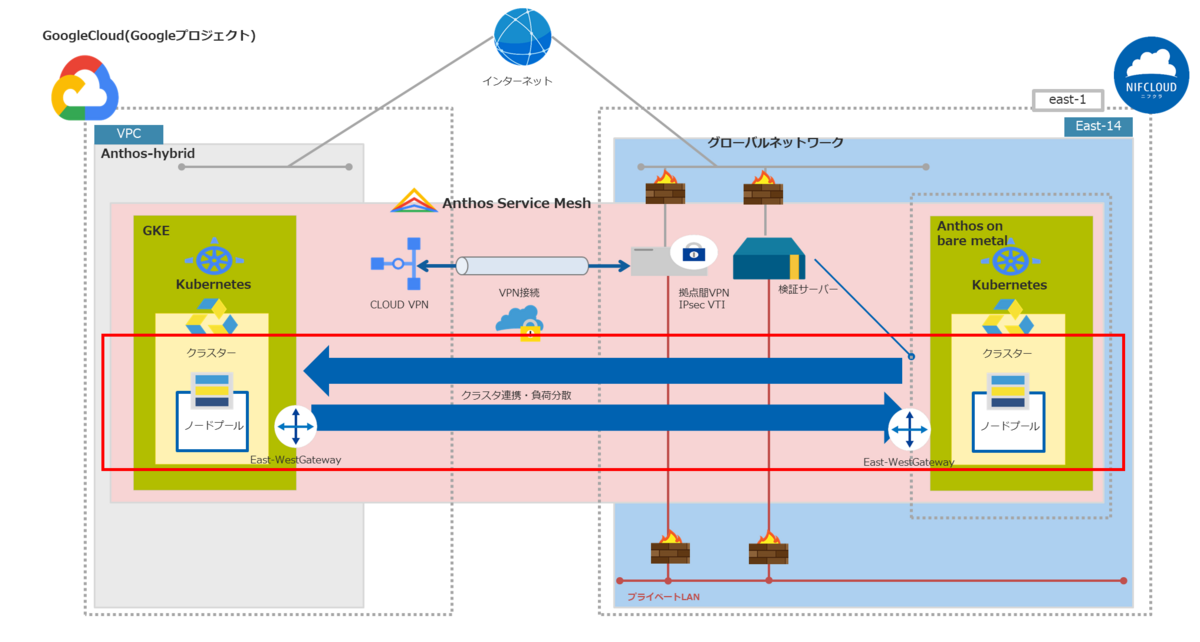
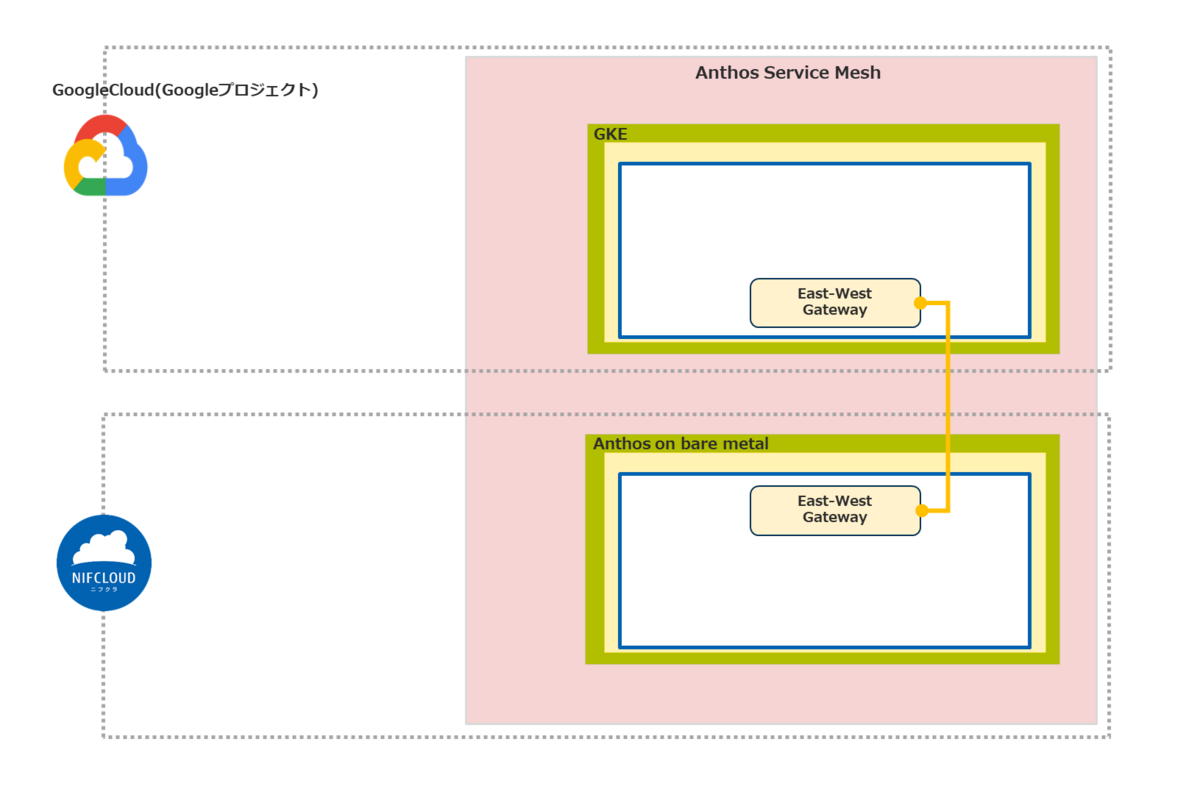
全体構成イメージ
前提条件
- FJcloud-V(旧ニフクラ)の基本的なコントロールパネルの操作、サービスを利用する知識
- GoogleCloudの基本的なコントロールパネルの操作、サービスを利用する知識
- Kubernetesの基本的な知識、利用経験
- Google Kubernetes Engine(GKE)クラスタの基本的な知識、利用経験
- Istio(他社サイトリンク)等のサービスメッシュの基本的な知識、利用経験
- GoogleCloudのアカウントを取得済み
- GoogleCloudにプロジェクトが作成済み
利用リソース
FJcloud-V(旧ニフクラ)リソース
- ファイアウォール
| ファイアウォール名 | INルール | 用途 |
|---|---|---|
| FWNIFC | TCP22:xxx.xxx.xxx.xxx | 外部のサーバー構築アクセス元から検証サーバーへのSSH接続用グローバルIP |
| ANY:anthos-hybridのus-central1リージョンの内部IP範囲 | GoogleCloud GKEクラスタ | |
| ANY:CloudVPNのグローバルIP | GoogleCloud CloudVPN |
- プライベートLAN
| プライベートLAN名 | CIDR | 用途 |
|---|---|---|
| NifcAnthosClsLan | 172.16.232.0/24 | 作成したAnthos on bare metalクラスタが展開されるネットワーク |
- 検証サーバー
| 項目 | 値 |
|---|---|
| サーバー名 | NifcAnthosSrv |
| OS | Ubuntu Server 20.04 LTS |
| サーバータイプ | e-large16 |
| グローバルIPアドレス | 自動割り当て |
| プライベートIPアドレス | 172.16.232.1 |
- 増設ディスク
| 項目 | 値 |
|---|---|
| ディスク名 | NifcDisk |
| ディスクタイプ | 標準ディスク |
| 容量 | 300G |
- 拠点間VPNゲートウェイ
| 項目 | 値 |
|---|---|
| VPN名 | NifcAnthosVpn |
| グローバルIPアドレス | 自動割り当て |
| プライベートIPアドレス | 172.16.232.2 |
- カスタマーゲートウェイ
| 項目 | 値 |
|---|---|
| 名前 | VPNCGW |
| 対向機器IPアドレス | CloudVPNのグローバルIP |
| 接続方式 | IPSec VTI |
| 対向機器LAN側IPアドレス帯 | anthos-hybridのus-central1リージョンの内部IP範囲 |
| 対向機器LAN側IPアドレス | 空欄 |
- VPNコネクション
| 項目 | 値 |
|---|---|
| カスタマーゲートウェイ | VPNCGW |
| 接続方式 | IPSec VTI |
| IKEバージョン | IKEv1 |
| 暗号化アルゴリズム | AES128 |
| 認証アルゴリズム | SHA1 |
| 事前共有キー | Cloud VPNで事前共有キー |
| IKE lifetime | 空欄 |
| ESP lifetime | 空欄 |
| DH Group | デフォルト |
GoogleCloudリソース
- VPC
| ネットワーク名 |
|---|
| anthos-hybrid |
- ファイアウォール
| ファイアウォール名 | 送信元IP | プロトコルとポート | 用途 |
|---|---|---|---|
| nifc-rules | 172.16.232.0/24(NifcAnthosClsLan) | 全て許可 | FJcloud-V(旧ニフクラ)Anthos on bare metalクラスタが稼働しているプライベートLAN環境からの通信を許可 |
| FJcloud-V(旧ニフクラ)拠点間VPNのグローバルIP | 全て許可 | FJcloud-V(旧ニフクラ)拠点間VPNゲートウェイからの通信を許可 |
- GKEクラスタ
| 項目 | 値 |
|---|---|
| 名前 | nifc-anthosgke-cls |
| ゾーン | us-central1-c |
| コントロールプレーンのバージョン | 静的バージョン |
| GKEバージョン | 1.27.3-gke.100 (デフォルト) |
| マシンの構成 | e2-standard-2以上 |
| ネットワーク | anthos-hybrid |
| ノードのサブネット | anthos-hybrid |
| IPv4ネットワークス | 一般公開クラスタ |
| Workload Identity | 有効 |
- CloudVPN
| 項目 | 値 |
|---|---|
| 名前 | nifc-anthos-vpn |
| ネットワーク | anthos-hybrid |
| リージョン | us-central1(アイオワ) |
| グローバルIPアドレス | 自動割り当て |
| トンネル名 | nif-anthos-tn |
| リモートピタIPアドレス | FJcloud-V(旧ニフクラ)拠点間VPNゲートウェイのグローバルIP |
| IKEバージョン | IKEv1 |
| IKE 事前共有キー | 任意で作成。 ※「生成してコピー」ボタンで作成しても良いがFJcloud-V(旧ニフクラ)側の文字制限で使用できない場合あり |
| ルーティングオプション | ルートベース選択 |
| リモートネットワークIPの範囲 | 172.16.232.0/24(NifcAnthosClsLan) |
Anthos Service Mesh(ASM)をインストール
FJcloud-V(旧ニフクラ)環境とGoogleCloud環境にASMをインストールします。
ASMパッケージをダウンロード
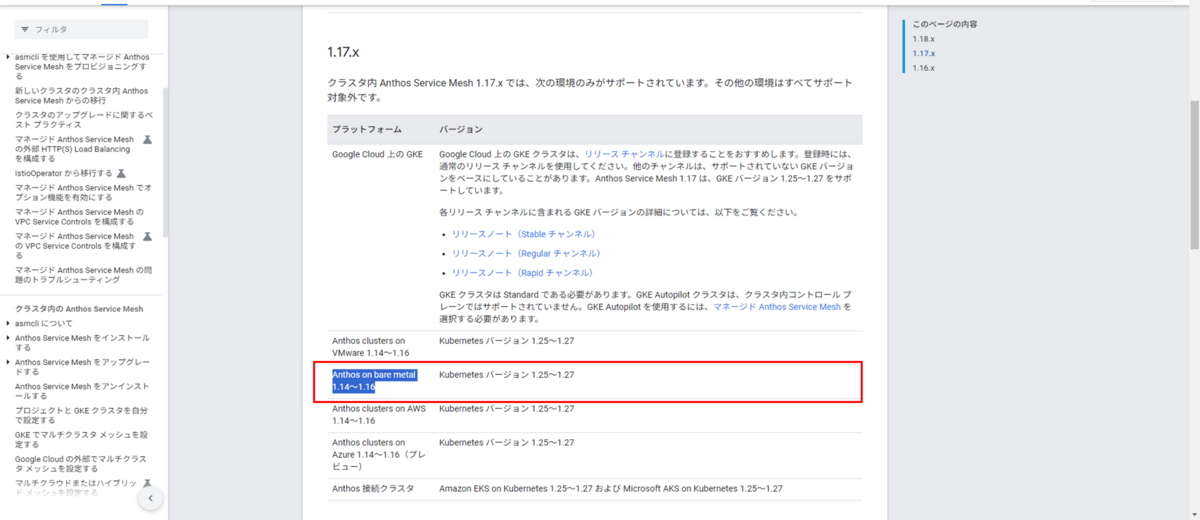
対応プラットフォーム(他社サイトリンク)で実行環境のAnthos on bare metalに対応しているASMバージョン(下図赤枠部分)を確認します。
ASMパッケージダウンロード(他社サイトリンク)に従ってパッケージをダウンロードします。
curlコマンドを実行してASMパッケージをダウンロードします。 ASMパッケージダウンロード(他社サイトリンク)では各バージョンの最新版を使用することが推奨されているのでバージョン指定はマイナーバージョン指定( asmcli_1.17 )です 。
curl https://storage.googleapis.com/csm-artifacts/asm/asmcli_1.17 > asmcli
※パッチバージョン番号(1.17. x )はASMをインストール後にasm_outputディレクトリ配下に展開されるディレクトリ名等で確認できます。
chmodコマンドを実行して実行権限を付与します。
chmod +x asmcli
以下のコマンドでASMのスクリプトに必要なjqをインストールします。
sudo apt -y install jq
FJcloud-V(旧ニフクラ)環境にASMをインストール
mkdirコマンドでasm_outputディレクトリ作成します。インストール時にASMでマルチクラスタ連携等を実施するためのライブラリ、マニュフェスト雛形が格納されます。
$ mkdir asm_output
検証サーバーで以下のコマンドでFJcloud-V(旧ニフクラ)環境にクラスタを切り替えます。
kubectl config use-context standalone-admin@standalone
検証サーバーで以下のコマンドを実行してASMをインストールします。
パラメーターの詳細はGoogleCloud以外のインストール(他社サイトリンク)で確認してください。
./asmcli install \
  --kubeconfig bmctl-workspace/nifc-anthosbm-cls/nifc-anthosbm-cls-kubeconfig \
  --fleet_id $CLOUD_PROJECT_ID \
  --output_dir asm_output \
  --platform multicloud \
  --enable_all \
  --ca mesh_ca
Successfully のメッセージが表示されます。
---------省略---------
asmcli: *****************************
asmcli: Successfully installed ASM.
---------省略---------
lsコマンドでインストールされた内容を確認します。asm_outputディレクトリにパッケージ内容が展開されています。
asm-1175-9-manifest-expanded.yaml、 asm-1175-9-manifest-raw.yaml、istio-1.17.5-asm.9の名称から、今回curlコマンドでダウンロードした最新バージョンは 1.17.5 になります。
$ ls -l asm_output/
total 40932
drwxr-xr-x 6 root root     4096 Jun 26 10:28 asm
-rw-r--r-- 1 root root   454017 Jun 26 13:13 asm-1175-9-manifest-expanded.yaml
-rw-r--r-- 1 root root     7995 Jun 26 13:13 asm-1175-9-manifest-raw.yaml
-rw------- 1 root root     2865 Jun 26 13:10 asm_kubeconfig
drwxr-x--- 6 root root     4096 Jun 10 12:29 istio-1.17.5-asm.9
lrwxrwxrwx 1 root root       31 Jun 26 10:28 istioctl -> istio-1.17.5-asm.9/bin/istioctl
-rwxr-xr-x 1 root root 40620032 Jun 11  2021 kpt
-rw-r--r-- 1 root root    13334 Jun 11  2021 lib.zip
-rw-r--r-- 1 root root   689493 Jun 11  2021 LICENSES.txt
-rw-r--r-- 1 root root    93757 Jun 26 13:13 logs.txt
drwxr-xr-x 4 root root     4096 Jun 26 10:28 samples
"asm-1175-9"というバージョンに関連づけされた値は控えておいてください。 次回「第4回. マルチクラスタメッシュ構成_疎通確認編」でASMの各種機能を有効にするサイドカー プロキシ インジェクション(他社サイトリンク)設定で使用します。
以上でFJcloud-V(旧ニフクラ)環境のASMのインストールは完了です。
GoogleCloud環境にASMをインストール
検証サーバーで以下のコマンドでGoogleCloud環境にクラスタを切り替えます。
kubectl config use-context gke_xxxx_us-central1-c_nifc-anthosgke-cls
検証サーバーで以下のコマンドを実行してASMをインストールします。
パラメーターの詳細はGKEのインストール(他社サイトリンク)で確認してください。
./asmcli install \
  --project_id $CLOUD_PROJECT_ID\
  --cluster_name nifc-anthosgke-cls  \
  --cluster_location us-central1-c \
  --fleet_id $CLOUD_PROJECT_ID \
  --output_dir asm_output \
  --enable_all \
  --ca mesh_ca
Successfully のメッセージが表示されます。
---------省略---------
asmcli: *****************************
asmcli: Successfully installed ASM.
---------省略---------
asm_outputディレクトリ資産は既にFJcloud-V(旧ニフクラ)環境インストールで展開され、FJcloud-V(旧ニフクラ)環境と共有するので特に確認はなしです。
以上でGoogleCloud環境のASMのインストールは完了です。
East-WestGatewayサービス公開
ASMパッケージのEast-WestGateway構成を利用してクラスタ同士が連携するハイブリッドメッシュ環境を構築します。FJcloud-V(旧ニフクラ)環境とGoogleCloud環境のKubernetesクラスタにデプロイしたサービスをEast-WestGateway上で公開します。
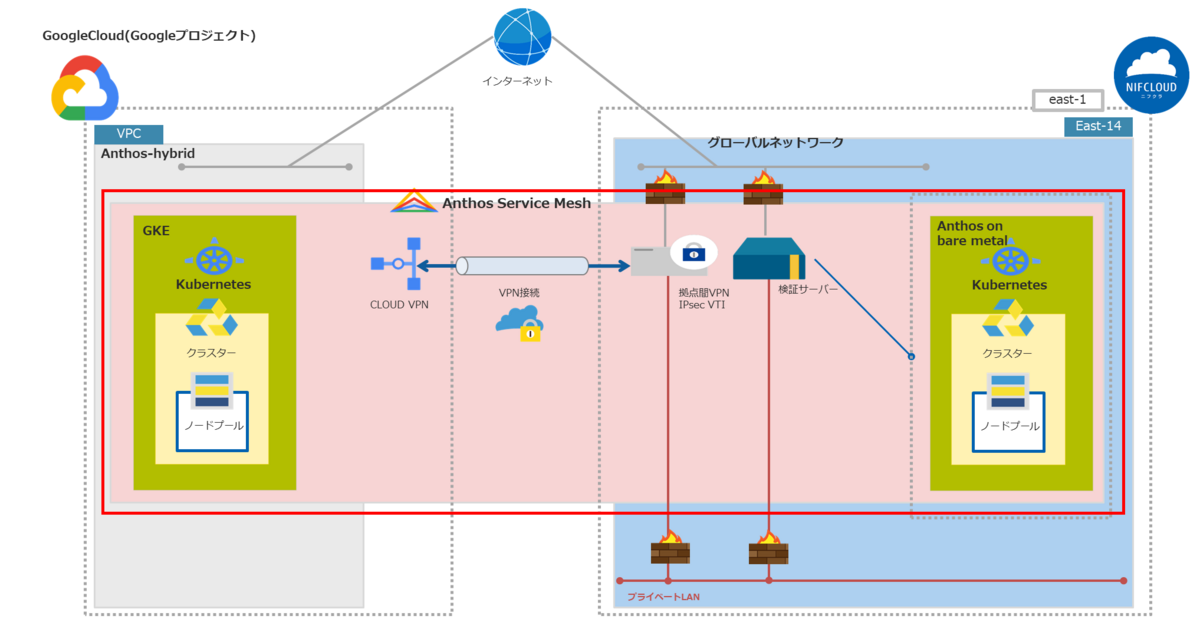
この項目・手順ではASM内部にスコープした構成図で解説します。
環境変数設定
East-WestGateway作成に必要な環境変数を設定します。
詳細は環境変数(他社サイトリンク)を参照してください。
export PROJECT_NUMBER=$(gcloud projects describe $CLOUD_PROJECT_ID --format="value(projectNumber)")
export MESH_ID="proj-${PROJECT_NUMBER}"
# Anthosクラスタの場合default
export NETWORK_1="default"
# GKEクラスタの場合{PROJECT ID}-{VPC名}で設定
export NETWORK_2="xxxxx-anthos-hybrid"
名前空間作成
以下のコマンドを実行して各クラスタにEast-WestGateway用の名前空間(nifc-gateway)を作成します。 ASM機能を有効にするために「istio-injection- istio.io/rev\=asm-ASMのバージョン」でラベルを作成します。
for CTX in ${CTX_CLUSTER1} ${CTX_CLUSTER2}
do
    kubectl create --context=${CTX} namespace nifc-gateway
    kubectl label --context=${CTX} namespace nifc-gateway   istio-injection- istio.io/rev=asm-1175-9 --overwrite
done
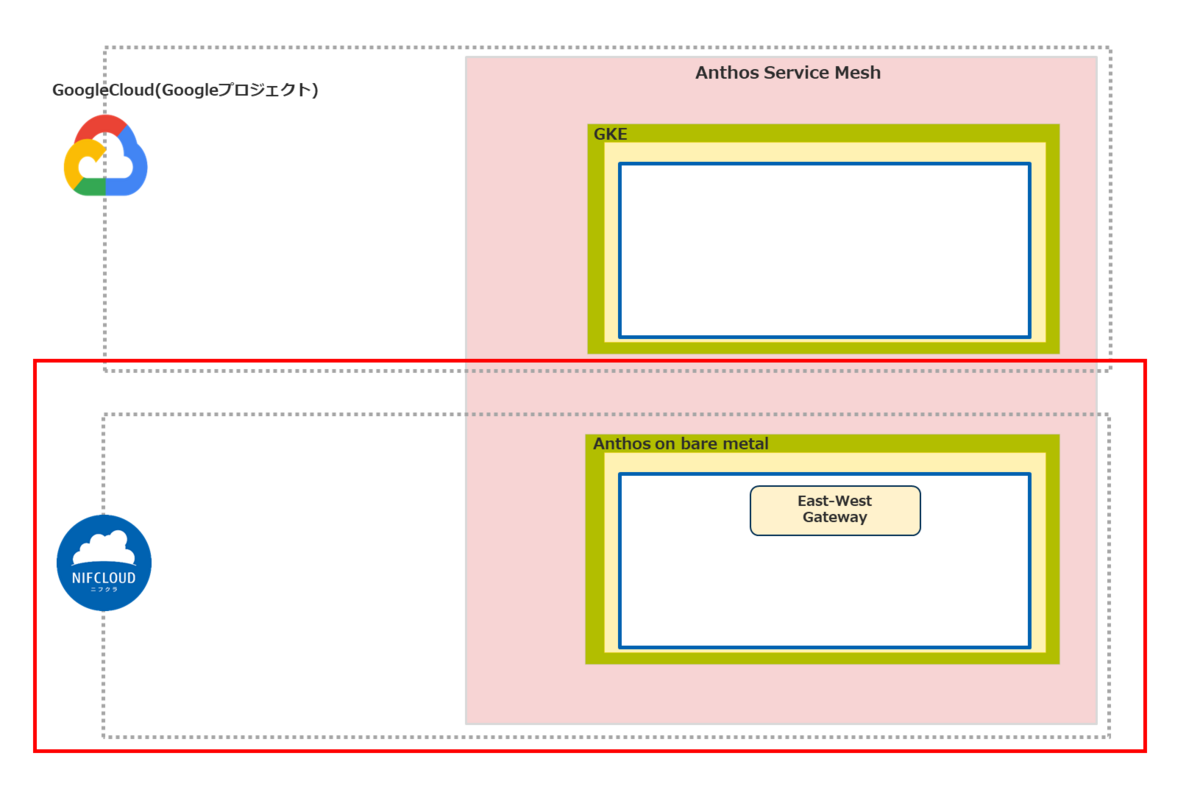
FJcloud-V(旧ニフクラ)環境East-WestGateway作成
FJcloud-V(旧ニフクラ)環境のAnthosクラスタにEast-WestGatewayを作成します。
asm_outputディレクトリ配下にある /istio/expansion/gen-eastwest-gateway.sh を使って雛形マニュフェストを作成します。 以下のコマンドでFJcloud-V(旧ニフクラ)Anthosクラスタ側の雛形マニュフェスト(eastwest-gateway-anthos.yaml)を出力します。
asm_output/asm/istio/expansion/gen-eastwest-gateway.sh --mesh ${MESH_ID} --network ${NETWORK_1} --revision asm-1175-9 > eastwest-gateway-anthos.yaml
viコマンドを実行してeastwest-gateway-anthos.yamlを編集します。
$ vi eastwest-gateway-anthos.yaml
編集内容は以下です。
- namespaceを追加
- 内部ロードバランサーとして扱うためserviceAnnotationsを追加
eastwest-gateway-anthos.yaml
apiVersion: install.istio.io/v1alpha1
kind: IstioOperator
metadata:
  name: eastwest
spec:
  revision: "asm-1175-9"
  profile: empty
  components:
    ingressGateways:
      - name: istio-eastwestgateway
        namespace: nifc-gateway       #作成した名前空間(nifc-gateway)を追加
        label:
          istio: eastwestgateway
          app: istio-eastwestgateway
          topology.istio.io/network: default
        enabled: true
        k8s:
          serviceAnnotations:
            cloud.google.com/load-balancer-type: "internal" #内部ロードバランサーの設定を追加
          env:
            # traffic through this gateway should be routed inside the network
            - name: ISTIO_META_REQUESTED_NETWORK_VIEW
              value: default
          service:
            ports:
              - name: status-port
                port: 15021
                targetPort: 15021
              - name: tls
                port: 15443
                targetPort: 15443
              - name: tls-istiod
                port: 15012
                targetPort: 15012
              - name: tls-webhook
                port: 15017
                targetPort: 15017
  values:
    gateways:
      istio-ingressgateway:
        injectionTemplate: gateway
    global:
      network: default
以下のコマンドを実行してFJcloud-V(旧ニフクラ)AnthosクラスタEast-WestGatewayのpod,serviceをデプロイします。
$ asm_output/istioctl install -y -f eastwest-gateway-anthos.yaml --context=${CTX_CLUSTER1}
インストールが完了してメッセージが表示されます。
? Ingress gateways installed
? Installation complete
Thank you for installing Istio 1.17.  Please take a few minutes to tell us about your install/upgrade experience!  https://forms.gle/xxxxx
kubectlコマンドで作成されたpodとサービスを確認します。
※CLUSTER-IP、EXTERNAL-IPがクラスタ構成ファイルで設定した範囲で作成されています。
$ kubectl -n nifc-gateway get pods,svc --context=${CTX_CLUSTER1}

NAME                                         READY   STATUS    RESTARTS   AGE
pod/istio-eastwestgateway-xxxxxx-xxxxxx   1/1     Running   0          44h

NAME                            TYPE           CLUSTER-IP    EXTERNAL-IP      PORT(S)                                                           AGE
service/istio-eastwestgateway   LoadBalancer   10.96.6.223   172.16.232.122   15021:30760/TCP,15443:31133/TCP,15012:32330/TCP,15017:30552/TCP   44h
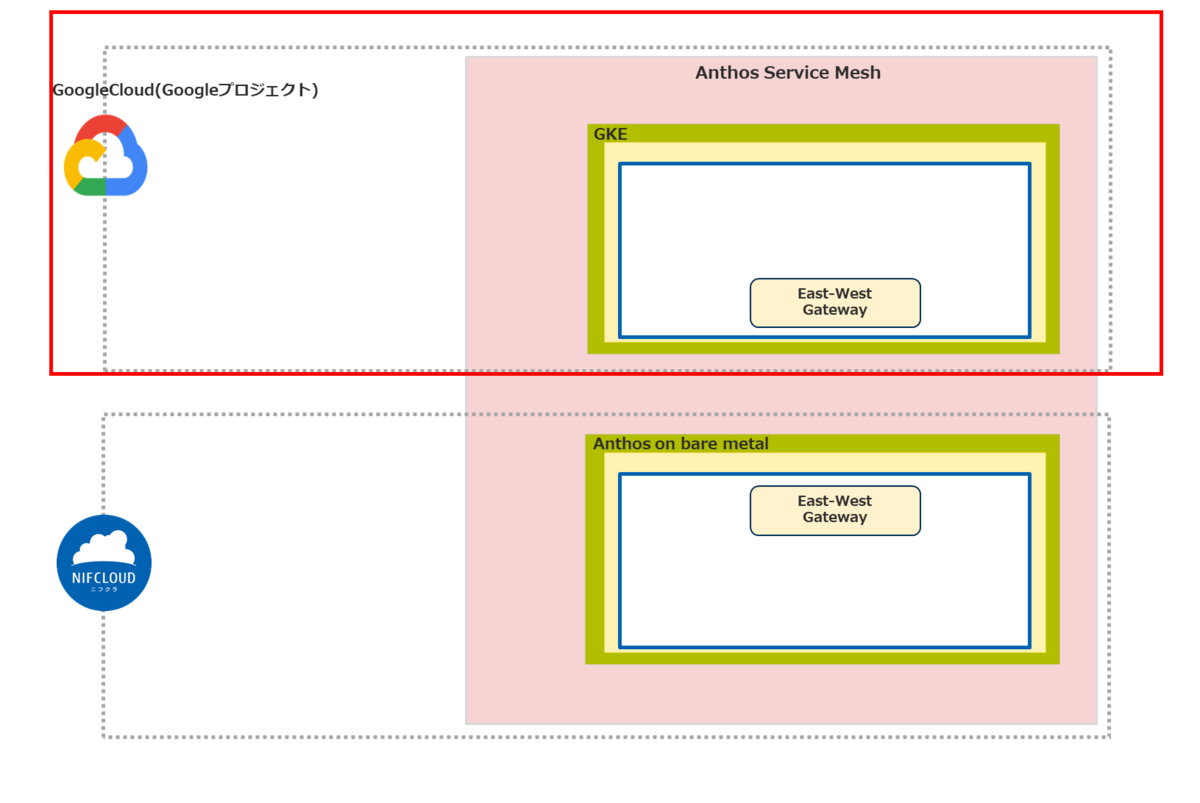
GoogleCloud環境East-WestGateway作成
GoogleCloud環境のGKEクラスタにEast-WestGatewayを作成します。
FJcloud-V(旧ニフクラ)Anthosクラスタ側同様に、以下のコマンドでGKEクラスタ側の雛形マニュフェスト(eastwest-gateway-gke.yaml)を出力します。
asm_output/asm/istio/expansion/gen-eastwest-gateway.sh --mesh ${MESH_ID} --network ${NETWORK_2} --revision asm-1175-9 > eastwest-gateway-gke.yaml
viコマンドを実行してeastwest-gateway-gke.yamlを編集します。
$ vi eastwest-gateway-gke.yaml
編集内容は以下です。
- namespaceを追加
- 内部ロードバランサーとして扱うためserviceAnnotationsを追加
eastwest-gateway-gke.yaml
apiVersion: install.istio.io/v1alpha1
kind: IstioOperator
metadata:
  name: eastwest
spec:
  revision: "asm-1175-9"
  profile: empty
  components:
    ingressGateways:
      - name: istio-eastwestgateway
        namespace: nifc-gateway       #作成した名前空間(nifc-gateway)を追加
        label:
          istio: eastwestgateway
          app: istio-eastwestgateway
          topology.istio.io/network: xxxxx-anthos-hybrid
        enabled: true
        k8s:
          serviceAnnotations:
            cloud.google.com/load-balancer-type: "internal" #内部ロードバランサーの設定を追加
          env:
            # traffic through this gateway should be routed inside the network
            - name: ISTIO_META_REQUESTED_NETWORK_VIEW
              value: xxxxx-anthos-hybrid
          service:
            ports:
              - name: status-port
                port: 15021
                targetPort: 15021
              - name: tls
                port: 15443
                targetPort: 15443
              - name: tls-istiod
                port: 15012
                targetPort: 15012
              - name: tls-webhook
                port: 15017
                targetPort: 15017
  values:
    gateways:
      istio-ingressgateway:
        injectionTemplate: gateway
    global:
      network: xxxxx-anthos-hybrid
以下のコマンドを実行してFJcloud-V(旧ニフクラ)AnthosクラスタEast-WestGatewayのpod,serviceをデプロイします。
$ asm_output/istioctl install -y -f eastwest-gateway-gke.yaml --context=${CTX_CLUSTER2}
インストールが完了してメッセージが表示されます。
? Ingress gateways installed
? Installation complete
Thank you for installing Istio 1.17.  Please take a few minutes to tell us about your install/upgrade experience!  https://forms.gle/xxxxx
kubectlコマンドで作成されたpodとサービスを確認します。
※CLUSTER-IP、EXTERNAL-IPがanthos-hybridのus-central1リージョンの内部IP範囲、内部サブネットIP範囲で作成されています。
$ kubectl -n nifc-gateway get pods,svc --context=${CTX_CLUSTER2}

NAME                                         READY   STATUS    RESTARTS   AGE
pod/istio-eastwestgateway-xxxxxx-xxxxxx   1/1     Running   0          44h

NAME                            TYPE           CLUSTER-IP    EXTERNAL-IP      PORT(S)                                                           AGE
service/istio-eastwestgateway   LoadBalancer   10.52.13.147   10.128.0.23   15021:30760/TCP,15443:31133/TCP,15012:32330/TCP,15017:30552/TCP   44h
East-WestGateway連携設定
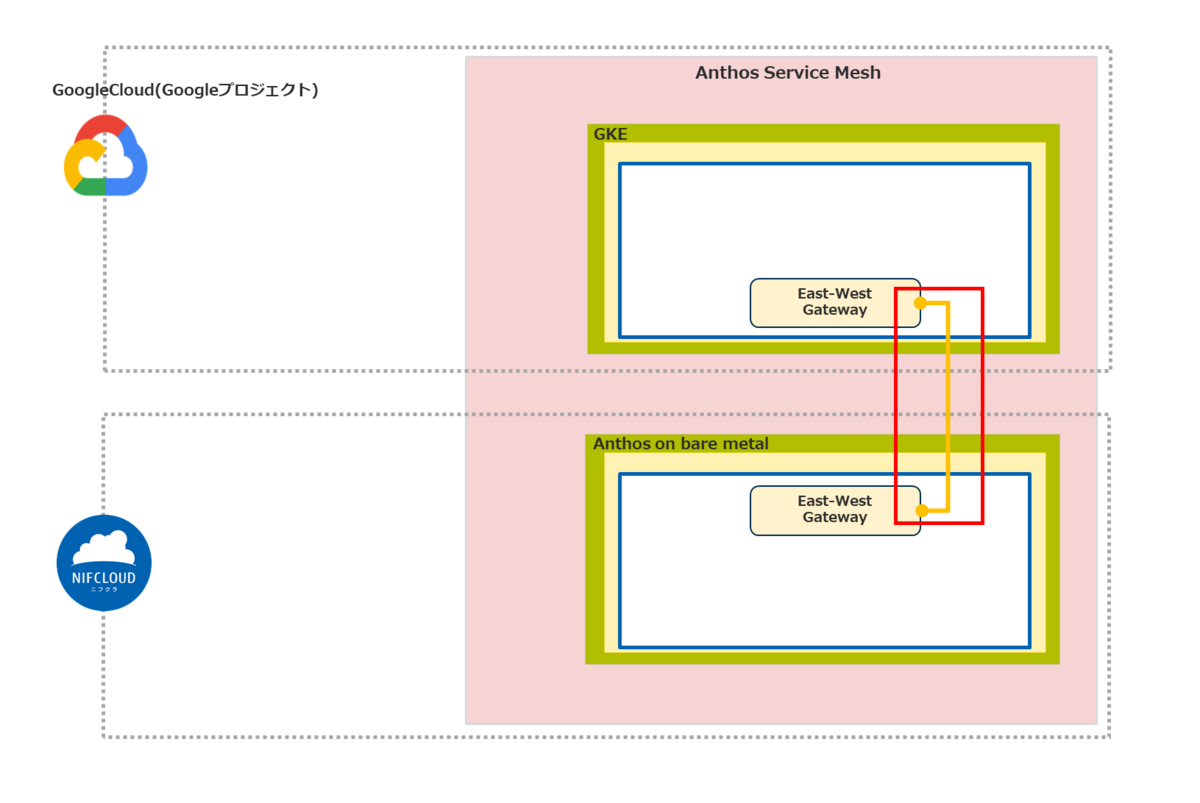
asm_outputディレクトリ配下にある/istio/expansion/expose-services.yamlを使ってEast-WestGateway上でサービスを公開する設定をします。 viコマンドでnamespaceを追記します。
$ vi asm_output/istio/expansion/expose-services.yaml
編集内容は以下です。
- namespaceを追加
expose-services.yaml
apiVersion: networking.istio.io/v1alpha3
kind: Gateway
metadata:
  name: cross-network-gateway
  namespace: nifc-gateway      #作成した名前空間(nifc-gateway)を追加
spec:
  selector:
    istio: eastwestgateway
  servers:
    - port:
        number: 15443
        name: tls
        protocol: TLS
      tls:
        mode: AUTO_PASSTHROUGH
      hosts:
        - "*.local"
